
- on Sun 24 January 2016
Tags: DIY
This post is a quick write up of my weekend project, the Cookin' Tunes Button.
Like most people, I occasionally need to eat. When I do eat, I prefer to share the meal with my friends. At home, I normally share my meal with my roommate, who also occasionally needs to eat. Unfortunately, eating at home normally means cooking at home.
To make the process of cooking more entertaining, my roommate and I set up speakers in our kitchen. These speakers run into my roommate's entertainment system computer in the next room. The speakers are an old 5.1 surround sound kit I happened to have lying around, which give great sound. Many tasty meals have been made while we listen to our cooking tunes.
The Problem
There is only one problem with our setup. The speakers are plugged into a computer that already has a great soundbar for use when streaming movies. The way we deal with this is that when we want to cook we switch the "default sound device" to the kitchen speakers. The "default sound device" is how windows tracks where to send sound, for example, most computers will switch the default sound device to headphones whenever headphones are plugged in.
When we want to cook we need to switch the default sound device from our living room speakers to our kitchen speakers. When we want to watch something while we eat we have to go in again and switch back to the living room speakers, The problem with this is that windows does not make it particularly easy to change the sound settings. We normally end up going through two or three menus to get to the sound settings, that means four or five mouse clicks each switch.
OK, so its not actually that big of a problem, but we do it often enough that it gets annoying.
Cookin' Tunes Button
After a few months living under the tyranny of having to use a series of system menus to change the sound settings I had had enough. I decided to build a button to automatically switch speakers. Hence, the "Cookin' Tunes Button", a small wall mounted button that, when pressed, cycles through sound devices so that we can easily switch from living room to kitchen and back again.
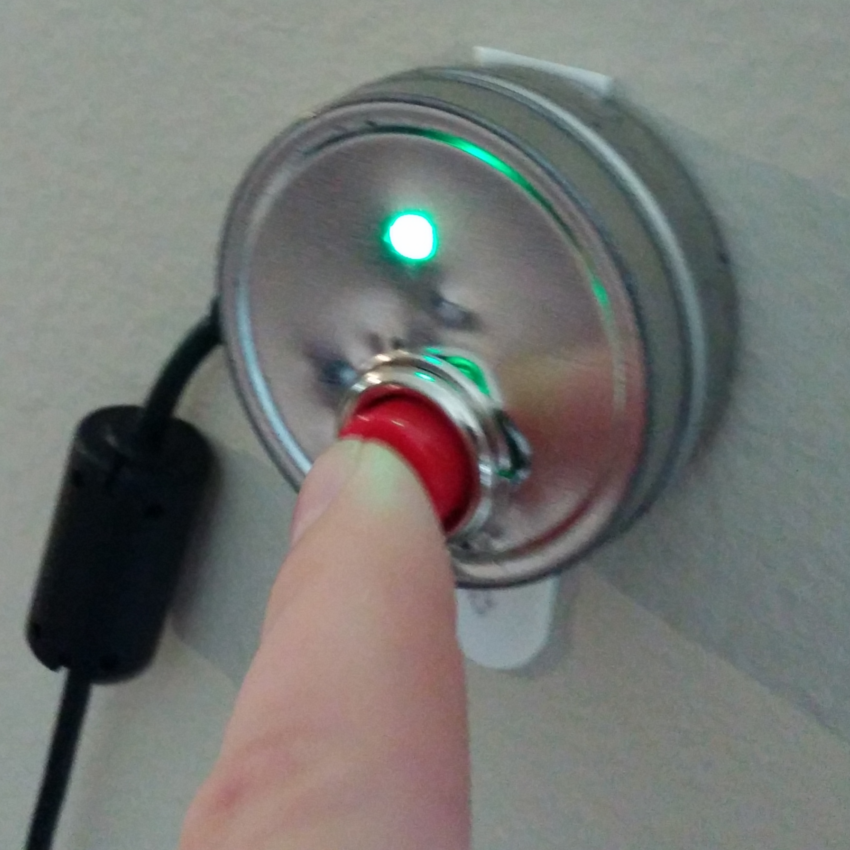
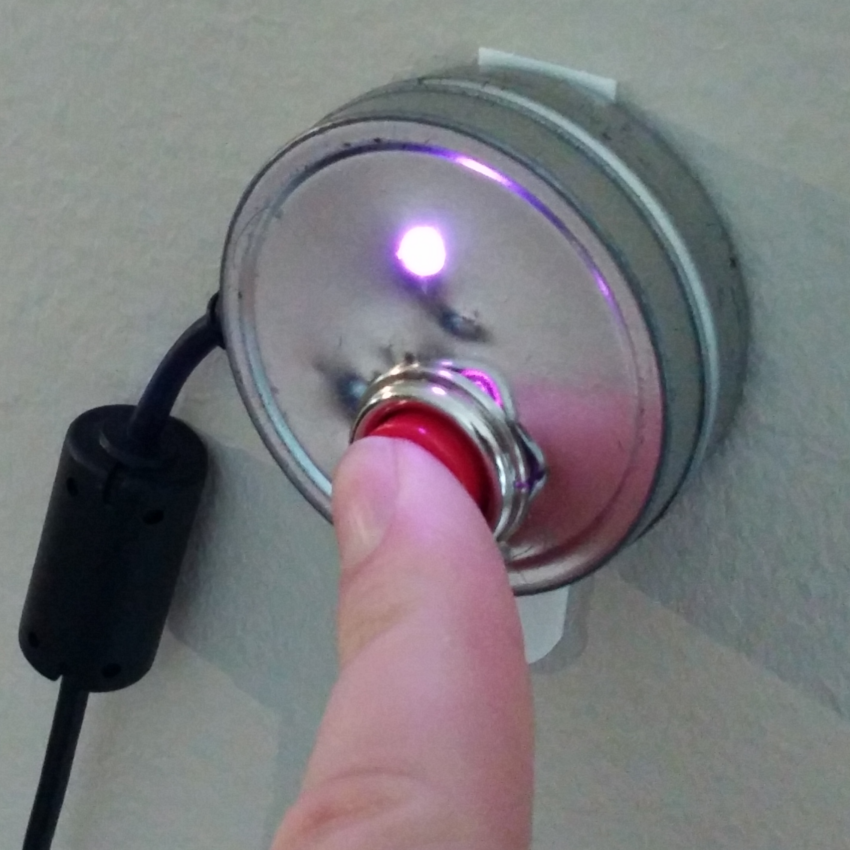
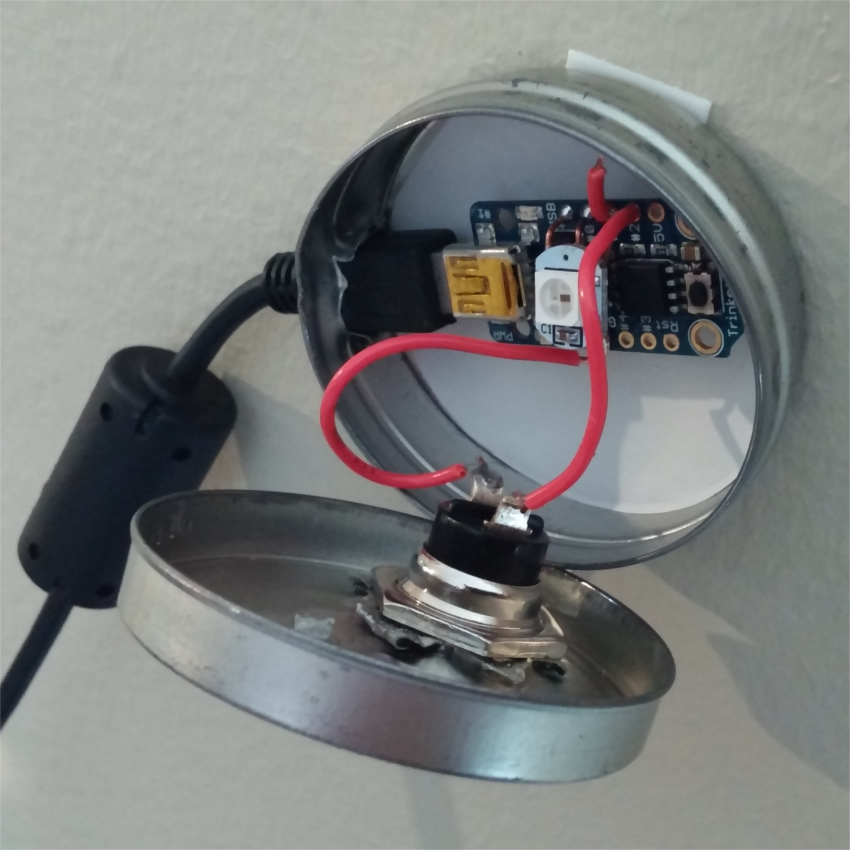
The device is relatively simple. I'm using an old tin (which I think at some point contained a toy) as a case, and a nice looking momentary push button I had sitting around. The controller is an Adafruit Trinket. The led is a neopixel (an inexpensive three color led which can be controlled on one pin). The three color led is actually overkill for this project, but my trinket already had it attached from an earlier project I had decommissioned, so I decided to stick with it. Right now all the led does is change color when the button is down to give a little visual feedback.
The trinket is running custom arduino code I wrote that uses Adafruit's HID keyboard library. The HID keyboard library lets the trinket use the generic human interface USB device API to emulate a keyboard. When the button is pressed it sends a "Ctrl + Alt + Shift + M" keyboard command to the computer. This is caught by an application named Audio Switch, which allowed us to set a hotkey for cycling through the sound devices. In an ideal world I would just write a simple program to manage the switching myself. Unfortunately, windows doesn't have an officially supported API for switching default sound devices. In that light, the AudioSwitch software is the easiest to use way to connect my hardware button to the sound settings that I am aware of.
Problems making the device
There were only two serious problems making the device. First, was mounting the button. As it turns out the button was just a little too big for the case so I had to bend the contacts for the button, just a bit. Unfortunately, the metal contacts are cased in a weaker plastic at the base. I destroyed two buttons by breaking the plastic while trying to bend the contacts before I got one right.
The second complication was around which pin on the trinket I use for the button. Normally when you want to read a button on a trinket you set the pin to input mode and activate the internal pullup. This makes a high resistance connection between the pin and the high voltage so that the pin, in absence of any other connection, will be high. The pin is then connected to one side of the button, with the other side of the button connected to ground. When the button is pressed the low resistance path to ground will pull the pin from high to low. On the trinket, however, the pin I was was using is also connected to an onboard led. This led changed the properties of the pin making the pullup basically not work, so the pin would always read low.
I only found this out after soldering so I had to redo some of the wiring to account for this. In the end I switched the button to the other unused pin. I've read that you can also treat the led as an internal pulldown. I did not try this, as that would have required rewiring the other side of the button.
Final thoughts
Visually, I'm pretty happy with how the button turned out. The case is a bit dinged up since I made the button hole using hand tools. My dremmel probably would have made a cleaner job of it, but then I would have sweeping up metal shavings for weeks. Overall, however, it feels like the right size, has a very visible button, and looks nice while not drawing unnecessary attention to itself.
I hope to do more projects like this in 2016. While it may not be a revolutionary new device, and it may not solve a big problem with the world, I had fun making it and it does make an every day task just a little easier.