CSCI 2021 Project 3: Assembly Coding and Debugging
- Due: 11:59pm Wed 22-Mar-2023 on Gradescope
- Approximately 3.0-4.0% of total grade
- Projects are individual work: no collaboration with other students is allowed. Seek help from course staff if you get stuck for too long.
CODE/TEST DISTRIBUTION: p3-code.zip
VIDEO OVERVIEW: https://youtu.be/biLVZb4VzU8
CHANGELOG:
- Wed Mar 15 09:55:41 AM CDT 2023
- The Manual Inspection Criteria for Problem 1 has been adjusted so that each function implementation has 10 points of credit for a total of 60 points for Problem 1.
- Fri Mar 3 11:02:18 PM CST 2023
Fixed a typo in the code outline for
clock_updat_asm.swhich included a wrong function name.Added an overview video.
1 Introduction
This project will feel somewhat familiar in that it is nearly identical to the preceding project: there is a coding problem and a puzzle-solving problem. The major change is that everything is at the assembly level:
- Problem 1 re-works the LCD Clock functions from the previous project in x86-64 Assembly rather than C
- Problem 2 involves analyzing a binary executable to provide it with the correct input to "defuse" the executable much like the previous project's Puzzlebox problem
Working with assembly will get you a much more acquainted with the low-level details of the x86-64 platform and give you a greater appreciation for "high-level" languages (like C).
2 Download Code and Setup
Download the code pack linked at the top of the page. Unzip this which will create a project folder. Create new files in this folder. Ultimately you will re-zip this folder to submit it.
| File | State | Notes |
|---|---|---|
Makefile |
Provided | Problem 1 Build file |
clock.h |
Provided | Problem 1 header file |
clock_main.c |
Provided | Problem 1 main() function |
clock_sim.c |
Provided | Problem 1 clock simulator functions |
clock_update_asm.s |
CREATE | Problem 1 Assembly functions, re-code C in x86-64, main file to edit for problem 1 |
clock_update.c |
CREATE | Problem 1 C functions, COPY from Project 2 or see a staff member to discuss |
test_clock_update.c |
Testing | Problem 1 testing program for clock_update_asm.c |
test_clock_update.org |
Testing | Problem 1 testing data file |
test_hybrid.org |
Testing | Problem 1 testing data file for mixed C/Assembly |
testy |
Testing | Problem 1 test running script |
bomb_download.sh |
Provided | Problem 2 script used to download a bomb from the server |
bombNN.zip |
Download | Problem 2 Debugging problem, download from server or use bomb_download.sh |
bombNN/ |
Directory | Created by unzip bombNN.zip and contains the below files |
bombNN/bomb.c |
Unpack | Problem 2 main() for bomb |
bombNN/bomb |
Unpack | Problem 2 Executable to debug: this is the important one |
bombNN/README |
Unpack | Problem 2 Describes "owner" of the bomb |
input.txt |
Edit | Problem 2 Input for bomb, fill this in to defuse stages |
3 Problem 1: Clock Display Assembly Functions
The functions in this problem are identical to a previous project in which code to support an LCD clock display was written. These functions are:
int set_tod_from_ports(tod_t *tod)- Retrieves value
TIME_OF_DAY_PORTand converts this to number of seconds from the beginning of the day with rounding via bit shifts and masking. Then sets the fields of the struct pointed to bytodto have the correct hours, minutes, seconds, and AM/PM indication. int set_display_from_tod(tod_t tod, int *display)- Given a
tod_tstruct, reset and alter the bits pointed to bydisplayto cause a proper clock display. int clock_update()- Update global
CLOCK_DISPLAY_PORTusing theTIME_OF_DAY_PORT. Call the previous two functions.
The big change in this iteration will be that the functions must be written in x86-64 assembly code. As C functions each of these is short, up to 85 lines maximum. The assembly versions will be somewhat longer as each C line typically needs 1-4 lines of assembly code to implement fully. Coding these functions in assembly give you real experience writing working assembly code and working with it in combination with C.
The code setup and tests are mostly identical for this problem as for the previous C version of the problem. Refer to original Clock LCD Display Problem description for a broad overview of the simulator and files associated with it.
3.1 Hand-Code Your Assembly
As discussed in class, one can generate assembly code from C code with appropriate compiler flags. This can be useful for getting oriented and as a beginning to the code your assembly versions of the functions. However, this exercise is about writing assembly yourself to gain a deeper understanding of it.
Code that is clearly compiler-generated with no hand coding will receive 0 credit.
- No credit will be given on manual inspection
- Penalties will be assessed for Automated Tests which lower credit to 0
Do not let that dissuade you from looking at compiler-generated assembly code from you C solution to the functions. Make sure that you take the following steps which are part of the manual inspection criteria.
Base your Assembly code on your C code
The files to be submitted for this problem include
clock_update.c: C version of the functionsclock_update_asm.s: Assembly version of the functions
Graders may examine these for a correspondence between to the algorithm used in the C version to the Assembly version. Compiler generated assembly often does significant re-arrangements of assembly code with many intermediate labels that hand-written code will not have.
If you were not able to complete the C functions for the Project 2 or were not confident in your solutions, see a course staff member who will help you get them up and running quickly.
Annotate your Assembly Thoroughly
Comment your assembly code A LOT. While good C code can be quite self-explanatory with descriptive variable names and clear control structures, assembly is rarely so easy to understand. Include clear commentary on your assembly. This should include
- Subdividing functions into smaller blocks with comments describing what the blocks accomplish.
- Descriptions of which "variables" from the C side are held in which registers.
- Descriptions of most assembly lines and their effect on the variables held in the registers.
- Descriptions of any data such as bitmasks stored in the assembly code.
- Use informative label names like
.ROUNDING_UPto convey further meaning about what goals certain positions in code are accomplishing.
Use Division
While it is a slow instruction that is cumbersome to set up, using
idivX division instruction is the most human-readable means to
compute several results needed in the required functions. Compiler
generated code uses many tricks to avoid integer division so a lack of
idivX instructions along this line will be a clear sign little
effort has been put into the assembly code.
3.2 General Cautions when coding Assembly
- Get your editor set up to make coding assembly easier. If you are using VS Code, the following video will show you how to install an extension to do syntax highlighting and block comment/uncomment operations in assembly: https://youtu.be/AgmXUFOEgIw
- Be disciplined about your register use: comment what "variables" are in which registers as it is up to you to keep track. The #1 advice from past students to future students is "Comment the Crap out of your assembly code" on this project.
Be Careful with constants: forgetting a
$in constants will lead to a bare, absolute memory address which will likely segfault your program. Contrast:movq $0,%rax # rax = 0 movq 0, %rax # rax = *(0): segfault # bare 0 is memory address 0 - out of boundsRunning your programs, assembly code included, in Valgrind can help to identify these problems. In Valgrind output, look for a line number in the assembly code which has absolute memory addresses or a register that has an invalid address.
Recognize that in x86-64 function parameters are passed in registers for up to 6 arguments. These are arranged as follows
rdi / edi / di(arg 1)rsi / esi / si(arg 2)rdx / edx / dx(arg 3)rcx / ecx / cx(arg 4)r8 / r8d / r8w(arg 5)r9 / r9d / r9w(arg 6)
and the specific register corresponds to how argument sizes (64 bit args in
rdi, 32 bit inedi, etc). The functions you will write have few arguments so they will all be in registers.Use registers sparingly. The following registers (64-bit names) are "scratch" registers or "caller save." Functions may alter them freely (though some may contain function arguments).
rax rcx rdx rdi rsi r8 r9 r10 r11 # Caller save registers
No special actions need to be taken at the end of the function regarding these registers except that
raxshould contain the function return value.Remaining registers are "callee save": if used, their original values must be restored before returning from the function.
rbx rbp r12 r13 r14 r15 # Callee save registers
This is typically done by pushing the callee registers to be used on the stack, using them, them popping them off the stack in reverse order. Avoid this if you can (and you probably can in our case).
- Be careful to adjust the stack pointer using
pushX/popXorsubq/addq. Keep in mind the stack must be aligned to 16-byte boundaries for function calls to work correctly. Above all, don't treatrspas a general purpose register.
3.3 Register Summary Diagram
For reference, here is a picture that appears in the lecture slides that summarizes the names and special uses for the registers in x86-64.
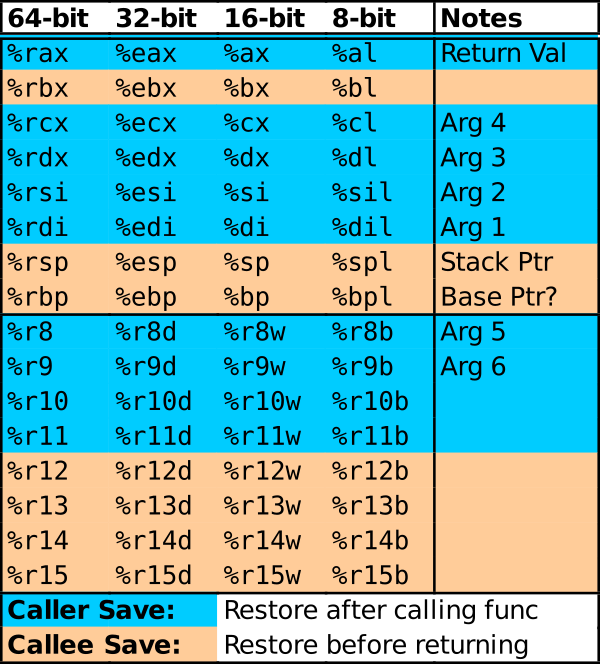
Figure 1: Summary of general purpose register usages in x86-64.
3.4 Structure of clock_update_asm.s
Below is a rough outline of the structure of required assmebly file. Consider copying this file as you get started and commenting parts of it out as needed.
.text                           # IMPORTANT: subsequent stuff is executable
.global  set_tod_from_ports

## ENTRY POINT FOR REQUIRED FUNCTION
set_tod_from_ports:
        ## assembly instructions here

        ## a useful technique for this problem
        movX    SOME_GLOBAL_VAR(%rip), %reg  # load global variable into register
                                             # use movl / movq / movw / movb
                                             # and appropriately sized destination register

### Data area associated with the next function
.data                           # IMPORTANT: use .data directive for data section

my_int:                         # declare location an single int
        .int 1234               # value 1234

other_int:                      # declare another accessible via name 'other_int'
        .int 0b0101             # binary value as per C '0b' convention

my_array:                       # declare multiple ints in a row
        .int 10                 # for an array. Each are spaced
        .int 20                 # 4 bytes from each other
        .int 30


.text                           # IMPORTANT: switch back to executable code after .data section
.global  set_display_from_tod

## ENTRY POINT FOR REQUIRED FUNCTION
set_display_from_tod:
        ## assembly instructions here

	## two useful techniques for this problem
        movl    my_int(%rip),%eax    # load my_int into register eax
        leaq    my_array(%rip),%rdx  # load pointer to beginning of my_array into rdx


.text
.global clock_update

## ENTRY POINT FOR REQUIRED FUNCTION
clock_update:
	## assembly instructions here
3.5 set_tod_from_ports()
int set_tod_from_ports(tod_t *tod);
// Reads the time of day from the TIME_OF_DAY_PORT global variable. If
// the port's value is invalid (negative or larger than 16 times the
// number of seconds in a day) does nothing to tod and returns 1 to
// indicate an error. Otherwise, this function uses the port value to
// calculate the number of seconds from start of day (port value is
// 16*number of seconds from midnight). Rounds seconds up if there at
// least 8/16 have passed. Uses shifts and masks for this calculation
// to be efficient. Then uses division on the seconds since the
// begining of the day to calculate the time of day broken into hours,
// minutes, seconds, and sets the AM/PM designation with 1 for AM and
// 2 for PM. By the end, all fields of the `tod` struct are filled in
// and 0 is returned for success.
 //
// CONSTRAINT: Uses only integer operations. No floating point
// operations are used as the target machine does not have a FPU.
Note that this function uses a tod_t struct which is in clock.h
described here:
// Breaks time down into 12-hour format
typedef struct{
  int   day_secs;    // seconds from start of day
  short time_secs;   // seconds in current hour
  short time_mins;   // minutes in current hour
  short time_hours;  // current hour of day
  char  ampm;        // 1 for am, 2 for pm
} tod_t;
Assembly Implementation Notes set_tod_from_ports
- The function one argument: a pointer to a struct which will be in
register
rdi. - Return values or functions are to be placed
eaxfor 32 bit quantities as is the case here (int). To access a global variable and copy it into a register, use the following assembly syntax
movl TIME_OF_DAY_PORT(%rip), %ecx # copy global var to reg ecx
The function should not change
TIME_OF_DAY_PORTso copying it to a register is among the first steps to perform.- Use comparisons and jump to a separate section of code that is clearly marked as "error" if you detect a bad arguments.
- Make use of shift / mask operations to convert the port value to the number of seconds from the beginning of the day. Use the remainder value to determine if seconds should round up or not.
- Make use of division to "break down" the argument
time_secs. Keep in mind that theidivlinstruction must haveeaxas the dividend,edxzeroed out via acqtoinstruction. Any 32-bit register can contain thedivisor. After the instruction,eaxwill hold thequotientandedxthe remainder. With cleverness, you'll only need to do a couple divisions. A pointer to a
tod_tstruct can access its fields using the following offset table which assume that%regholds a pointer to the struct (substitute an actual register name).Destination Assembly C Field Access Offset Size Assign 5 to field tod->day_secs0 bytes 4 bytes movl $5, 0(%reg)tod->time_secs4 bytes 2 bytes movw $5, 4(%reg)tod->time_mins6 bytes 2 bytes movw $5, 6(%reg)tod->time_hours8 bytes 2 bytes movw $5, 8(%reg)tod->ampm10 bytes 1 byte movb $5,10(%reg)You will need to use these offsets to set the fields of the struct near the end of the routine.
3.6 set_display_from_tod
int set_display_from_tod(tod_t tod, int *display);
// Accepts a tod and alters the bits in the int pointed at by display
// to reflect how the LCD clock should appear. If any time_** fields
// of tod are negative or too large (e.g. bigger than 12 for hours,
// bigger than 59 for min/sec) or if the AM/PM is not 1 or 2, no
// change is made to display and 1 is returned to indicate an
// error. The display pattern is constructed via shifting bit patterns
// representing digits and using logical operations to combine them.
// May make use of an array of bit masks corresponding to the pattern
// for each digit of the clock to make the task easier.  Returns 0 to
// indicate success. This function DOES NOT modify any global
// variables
Assembly Implementation Notes set_display_from_tod
- Arguments will be
- a packed
tod_tstruct in%rdiand%rsi - an integer pointer in
%rdx
- a packed
The packed
tod_tstruct is spread across two registers,%rdiand%rsiso will have the following layout.Bits Shift C Field Access Register in reg Required Size tod.day_secs%rdi0-31 None 4 bytes tod.time_secs%rdi32-47 Right by 32 2 bytes tod.time_mins%rdi48-63 Right by 48 2 bytes tod.time_hours%rsi0-15 None 2 bytes tod.ampm%rsi16-23 Right by 16 1 bytes To access individual fields of the struct, you will need to do shifting and masking to extract the values from the
%rdi / %rsiregisters.- Use comparisons and jump to a separate section of code that is
clearly marked as "error" if you detect bad fields in the
todstruct argument. As was the case in the C version of the problem, it is useful to create a table of bit masks corresponding to the bits that should be set for each clock digit (e.g. digit "1" has bit patter
0b0000110). In assembly this is easiest to do by using a data section with successive integers. An example of how this can be done is below..section .data array: # an array of 3 ints .int 200 # array[0] = 200 .int 300 # array[1] = 300 .int 400 # array[3] = 400 const: .int 17 # special constant .section .text .globl func func: leaq array(%rip),%r8 # r8 points to array, rip used to enable relocation movq $2,%r9 # r9 = 2, index into array movl (%r8,%r9,4),%r10d # r10d = array[2], note 32-bit movl and dest reg movl const(%rip),%r11d # r11d = 17 (const), rip used to enable relocationAdapt this example to create a table of useful bit masks for digits. The GCC assembler understands binary constants specified with the
0b0011011style syntax.- Make use of division again to compute "digits" for the ones and tens place of the hours and minutes for the clock. Use these digits to reference into the table of digit bit masks you create to progressively build up the correct bit pattern for the clock display.
- Use shifts and ORs to combine the digit bit patterns to create the final clock display bit pattern.
3.7 clock_update
int clock_update();
// Examines the TIME_OF_DAY_PORT global variable to determine hour,
// minute, and am/pm.  Sets the global variable CLOCK_DISPLAY_PORT bits
// to show the proper time.  If TIME_OF_DAY_PORT appears to be in error
// (to large/small) makes no change to CLOCK_DISPLAY_PORT and returns 1
// to indicate an error. Otherwise returns 0 to indicate success.
//
// Makes use of the previous two functions: set_tod_from_ports() and
// set_display_from_tod().
//
// CONSTRAINT: Does not allocate any heap memory as malloc() is NOT
// available on the target microcontroller.  Uses stack and global
// memory only.
Assembly Implementation Notes for clock_update
- No arguments come into the function.
Call the two previous functions to create the struct and manipulate the bits of an the display. Calling a function requires that the stack be aligned to 16-bytes; there is always an 8-byte quantity on the stack (previous value of the
rspstack pointer). This means the stack must be extended with apushqinstruction before any calls. A typical sequence issubq $8,%rsp # extend the stack by 8 bytes call some_func # stack aligned, call function ## return val from func in rax or eax addq $8,Rsp # restore the stack ## NOTE: the above provides 8 bytes on the stack for local ## variables; in the likely event that more space in stack is ## needed, a bigger stack extension should be done but the stack ## should always be grown by 16*N+8 bytes if calling another ## function as this ensures proper alignment.
If several function calls will be made, a single stack extension is all that is needed. needed as in the below
   subq    $8,%rsp     # extend once
   call    some_func1  # stack aligned, call function
   ## return val from func in rax or eax

   ## do some more stuff

   call    some_func2  # stack aligned, call function
   ## return val from func in rax or eax

   addq     $8,%rsp    # restore the stack
- In order to call the
set_tod_from_ports()function, this function will need to allocate space on the stack for atod_t. This struct is 12 bytes big so at least that amount of memory will need be available in the stack for use. Since there are also function calls required, grow the stack by16*N+8bytes for a non-negative value ofN. - Similarly, to call the
set_display_from_tod()function, one will need a packedtod_tin a register. If the precedingset_tod_from_ports()call succeeded, this packed struct can be read from memory into registers with severalmovqinstructions. That stack space can re-used if needed. - Keep in mind that you will need to do error checking of the return values from the two functions: if they return non-zero values jump to a clearly marked "error" section and return a 1. If an error occurs, don't forget to pop restore registers and the stack pointer before returning.
3.8 Grading Criteria for Problem 1 grading 60
| Weight | Criteria |
|---|---|
| AUTOMATED TESTS | |
| 35 | make test-prob1 which uses programs test_clock_update and clock_main |
Provides 35 tests for functions in clock_update_asm.s |
|
| 1 point per test passed | |
| MANUAL INSPECTION CRITERIA | |
| 5 | General Criteria for all Functions |
| Clear signs of hand-crafted assembly are present. | |
| Detailed documentation/comments are provided showing the algorithm used in the assembly | |
There is a clear relation of the code to the C algorithm used in clock_update.c |
|
Use of good label names to indicate jump targets: .NEG_PORT is good, .L32 is bad |
|
| High-level variables and registers they occupy are documented in comments | |
| Error checking on the input values is done with a clear "Error" section/label for each function | |
Any callee save registers used (rbx rbp r12 r13 r14 r15) are pushed at the top of functions and popped at the end |
|
| 10 | set_tod_from_ports() |
Clear use of shift / mask instructions to convert TIME_OF_DAY_PORT to seconds with rounding |
|
| Clear use of the division instruction to compute the seconds, minutes, hours | |
Clear section or lines which write fields of tod_t struct to memory |
|
The idivX instruction is used to compute quotients and remainders that are needed. |
|
| 10 | set_display_from_clock() |
There is a clearly documented .data section in assembly setting up useful tables of bitmasks |
|
| Struct fields are unpacked from an argument register using shift operations | |
The idivX instruction is used to compute quotients and remainders that are needed. |
|
| 10 | clock_update() |
The stack is extended to make space available for local variables (tod_t struct) |
|
| Function calls to the earlier two functions are made with appropriate arguments passed | |
The stack is properly aligned at a 16-byte boundary for function calls, likely through a subq |
|
Changes to the stack for local variables / alignment are undone via a complementary addq instruction |
|
| There is a clear sequence of instructions that load a memory address for the first function call | |
| There is a clear sequence of instructions that load a packed struct into registers for the second function call |
NOTE: Passing all tests and earning all manual inspection criteria will earn up to 10 Points of Project Makeup Credit which will offset past and future loss of credit on projects.
4 Problem 2: The Binary Bomb
4.1 Quick Links
Available only on Lab Machines or Vole
| Download Bombs | http://bomblab.cselabs.umn.edu:15213/ or use ./bomb_downlad.sh |
| Score Board | http://bomblab.cselabs.umn.edu:15213/scoreboard |
| 2021 GDB Quick Guide/Assembly | https://www-users.cs.umn.edu/~kauffman/tutorials/gdb.html |
More details on these are described in subsequent sections.
4.2 Overview
The nature of this problem is similar to the previous project's
puzzlebox: there is a program called bomb which expects certain
inputs from a parameter file or typed as input. If the inputs are
"correct", a phase will be "defused" earning points and allowing
access to a subsequent phases. The major change is that the bomb
program is in binary so must be debugged in assembly.
Below is a summary of useful information concerning the binary bomb.
- Bombs are Individual
- The bomb you will download contains subtle variations so that the solution to yours will not work on other bombs. Feel free to discuss general techniques with classmates but know that you'll need to ultimately defuse your own bomb.
- Bombs are Binary
- A small amount of C code with the
main()function is included but the bulk of the code is binary which will require usinggdbto debug the assembly code. - Bombs only Run on Lab Machines
- To stay in contact with the scoring server, bombs won't run on your laptop. You'll need to work on them on lab machines.
- Bombs Take Input
- Similar to
puzzlebox, create aninput.txtfile which will contain your answers. Run bombs with this input file. Note that if the bomb runs out of input, you can type input directly into the bomb though this may look a little funny in the debugger. - Defusing Phases Earns Points
- As with the earlier
puzzlebox, points for this problem are earned based on how many phases are completed. Each phase that is completed will automatically be logged with the scoring server - Bomb Explosions Lose Points
- If incorrect input is entered and the bomb runs to completion, it will "explode" which causes credit to be deducted. See the scoring system for details. This can be prevented by setting breakpoints prior to the explosion sequence and restarting the bomb when those breakpoints are hit.
- Use GDB to work with Bombs
- The debugger is the best tool to work with running bombs. It may be tempting to try to brute force the bomb by trying many possible inputs but this may lead to many explosions or crashing the scoring server. Both of these are a bad idea so work with your bomb by hand.
4.3 Machines on which bombs run
The binary bomb makes frequent contact with a scoring server so you can only run it on a list of prescribed machines. These comprise most of the valid CSELabs machines and are listed in the table below.
| Machine | Login Address | Location |
|---|---|---|
| login01 | login01.cselabs.umn.edu | Machine Room |
| … | … | |
| login07 | login07.cselabs.umn.edu | Machine Room |
| atlas | csel-atlas.cselabs.umn.edu | Machine Room |
| apollo | csel-apollo.cselabs.umn.edu | Machine Room |
| Vole | csel-vole-01.cselabs.umn.edu | Virtual |
| csel-vole-02.cselabs.umn.edu | ||
| … | ||
| csel-vole-99.cselabs.umn.edu | ||
| 1-250 Lab | csel-kh1250-01.cselabs.umn.edu | Keller 1-250 |
| … | ||
| csel-kh1250-49.cselabs.umn.edu | ||
| 1-260 Lab | csel-kh1260-01.cselabs.umn.edu | Keller 1-260 |
| … | ||
| csel-kh1260-49.cselabs.umn.edu | ||
| Lind Lab | csel-lind40-01.cselabs.umn.edu | Lind Hall 40 |
| … | ||
| csel-lind40-43.cselabs.umn.edu | ||
| Walter Lab | csel-wb28-01.cselabs.umn.edu | Walter B28 |
| … | ||
| csel-wb28-27.cselabs.umn.edu |
Attempting to run a bomb on an un-authorized machine will error out immediately as in
> ./bomb
Initialization error: illegal host 'ck-laptop'.
Legal hosts are as follows:
  csel-apollo
  csel-atlas
  csel-vole-01
  csel-vole-02
  ...
4.4 Bomb Download and Setup
Download your bomb by running the provided script
p3-code>> ./bomb_download.sh
or by visiting the following web address
- Both the Script and the site must be accessed from CSE Labs Machines as the server providing them is behind the campus firewall. Using a browser on Vole or a FASTX connection is the easiest way get a bomb onto your CSELabs account when you are working remotely (and will let you tell friends "I've used a browser inside a browser.").
- Your UMN X.500 information is used by the script and must be provided on the site. IDs that don't correspond to members of the class will be rejected.
The bomb will download as a
.zipfile. On Unix machines, extract the contents using the commandunzipas in> ls bomb0013.zip > unzip bomb13.zip bomb0013/README bomb0013/bomb.c bomb0013/bomb > ls bomb0013.zip bomb0013/ > cd bomb0013 > ls bomb* bomb.c README
- The resulting bomb is unique for the downloader and the owner is in
the
READMEand logged on the download server. - The file
bomb(sometimes listed with a*to indicate it is executable) is a compiled binary so employ your assemblygdbskills to cracking it. Create a file
input.txt. The bomb can be run with it as in> ./bomb input.txt
but you'll likely want to do this in
gdbto avoid exploding the bomb.- Unlike previous puzzles, if
input.txtruns out of input, the bomb will prompt for you to type input. This can be a way to explore ahead a little bit in the bomb after solving a phase.
4.5 Scoring and Scoreboard (40%) grading 40
Scoring is done according to the following table.
| Pts | Phase | Notes |
|---|---|---|
| 10 | Phase 1 | |
| 10 | Phase 2 | |
| 10 | Phase 3 | |
| 5 | Phase 4 | |
| 5 | Phase 5 | |
| 5 | Phase 6 | Not Required |
| 5 | Bonus | Reduced when Explosions occur |
| 40 | 50 Max | 40 pts is full credit, 10 MAKEUP Credit available (and maybe more…) |
Explosion Penalty: 0.5 points are deducted for each explosion up to 10 explosions. 5pt bonus is reduced for every 2 explosions.
On successfully defusing stages, the bomb will contact a server which tracks scores by number. The scoreboard is here:
- http://bomblab.cselabs.umn.edu:15213/scoreboard
- The server is reachable only on UMN hardwired machines such as lab machines or Vole
You'll need to know your bomb number to see your score but can also see the scores of others.
Examples of Scoring
| Phases | Final | |||
|---|---|---|---|---|
| Defused | Explosions | Computation | Score | Notes |
| 6 | 1 | 45 + (5 - floor(0.5*1) ) | 50 | 1 explosion for free |
| 6 | 4 | 45 + (5 - floor(0.5*4) ) | 48 | |
| 6 | 10 | 45 + (5 - floor(0.5*10)) | 45 | |
| 6 | 20 | 45 + (5 - floor(0.5*10)) | 45 | Only count 10 explosions |
| 5 | 7 | 40 + (5 - floor(0.5*7)) | 42 | Round down for explosion penalties |
| 4 | 4 | 35 + (5 - floor(0.5*4)) | 38 | |
| 1 | 0 | 10 + (5 - floor(0.5*0)) | 15 | |
| 0 | 2 | 0 + (5 - floor(0.5*2)) | 4 | Even trying with an explosion gets something |
| 0 | 10 | 0 + (5 - (floor(0.5*10) | 0 |
Getting Credit for the Problem
- Ensure that the score listed on the Scoreboard site reflects your progress.
- Ensure your
input.txtalong with yourbombNN/directory are in your project directory with the rest of your code.
4.6 WARNING on Downloading Multiple Bombs
It is possible to download multiple bombs but this will NOT reset your explosion count. Quite the opposite: the default scoring system for the server uses the following conventions.
- Only the maximum phase defused in any bomb adds points
- Total explosions across ALL bombs subtract points with each separately downloaded bomb contributing up to -5.
Since more bombs likely means more explosions, you are strongly advised to download a single bomb and work with it.
4.7 Advice
If you accidentally run the bomb from the command line, you can kill it with the Unix interrupt key sequence
Ctrl-c(hold control, press C key).> ./bomb Welcome to my fiendish little bomb. You have 6 phases with which to blow yourself up. Have a nice day! ... >
Most of the time you should run the bomb in
gdbas in> gdb ./bomb
Refer to the Quick Guide to GDB if you have forgotten how to use
gdband pay particular attention to the sections on debugging assembly.- Figure out what the explosion routine is called and always set a breakpoint there. This will allow you to stop the bomb
- Make use of other tools to analyze the binary bomb aside from the
debugger. Some of these are described at the end of the Quick Guide
to GDB. They will allow you to search for "interesting" data in the
executable
bomb. The author of the bomb is encoded in the binary as a string somewhere which may be relevant to inputs for some phases. - Disassemble the executable to look at its entire source assembly code
as a text file. The Quick Guide to GDB shows how to use
objdumpto do this. Looking at the whole source code reveals that one cannot hide secrets easily in programs. - Feel free to do some internet research. The "bomb lab" assignment has a long history and there are some useful guides out there that can help you through rough patches. Keep in mind that your bomb will differ but the techniques to defuse it may be similar to others.